M Audio Xponent
This device has been discontinued. M-Audio discontinued its DJ products after the company was bought by inMusic in 2012. This device is a class compliant USB audio and MIDI device, so it does not require a special driver on any OS that Mixxx runs on.
Typically, the ASIO sound API is the best option on Windows and it requries an ASIO driver from the sound card manufacturer. However, it seems that the current version of the Xponent ASIO driver for Windows interferes with the ability to send MIDI control messages to the Xponent. As a result, if you are running M-Audio's Xponent ASIO drivers on Windows, the lights will not work. If you uninstall the drivers, the lights will work, but you can no longer use the Xponent's sound card with the ASIO sound API.
It is recommended to use the WDM-KS sound API instead. The sound card will appear as "Analog Connector 1 (Xponent Audio)" and "Analog Connector 2 (Xponent Audio)". Connector 2 is the main out, and Connector 1 is the headphones. The latency meter seems to run a bit higher than it did under ASIO, so keep this in mind, and test both setups with your own system to see how they compare. If you require low latency as well as a lot of effects or time stretching, you may want to run with the ASIO driver at the expense of the lights.
A new mapping has been merged with Mixxx and will be included in Mixxx in the 2.1 release. You can use it now with Mixxx 2.0 by downloading the following files and putting them in your controller mapping file locations#user controller mapping folder:
The script was written with the Mixco mapping framework. Documentation for the mapping is available on the Mixco website.
A separate, "Advanced" mapping has also been created, and is currently in testing, but is available from the Mixxx forums here.
The Mixco mapping included with Mixxx 2.1 and usable with Mixxx 2.0 does not require these steps.
How to start up Xponent in Listening Mode for LED support:
- Hold down the keys "2" (cues, not loops) and "key-lock" on the left deck of the Xponent
- Switch on the Xponent (while holding both keys)
- Wait until the Xponent is completely started up (red progress LEDS on both decks are fully lit) then release the keys
- Now LEDs work!
You can verify that the Xponent is in "listening" mode by observing the button behavior. If the buttons no longer pulse brightly and fade down when you press them, then the Xponent is in the correct mode for use with Mixxx.
A separate "Advanced" mapping is currently in its testing phase. The latest version can be found in this Forum Post.
This mapping expands on the stock 2.0 mapping by adding advanced features such as:
- Lights (No need to hold down any keys, but see the note for Windows users above)
- Samplers
- Effects
- Beatgrid manipulation
- Rolling beatloops
- Soft-takeover for critical controls
This mapping is not yet final, and is not included in current Mixxx distributions. This documentation should be considered preliminary and subject to change.
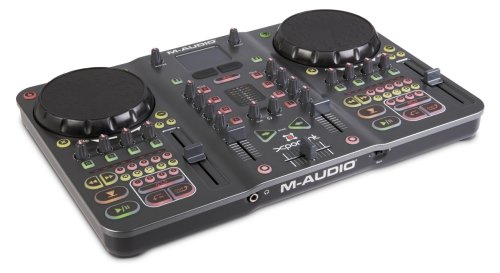
Please refer to the following diagram for control numbers.

| Number | Name | Description |
|---|---|---|
| 1 - 9 | Connections (Not pictured) | Audio, power, and USB connections. These are located on the back of the unit. |
| Bank | Bank switch (Not pictured) | Toggles between controlling decks 1 & 2 to decks 3 & 4. |
| 10 | Touch Sensitivity | Enables or disables "scratch mode". When the button is lit, scratch mode is enabled. |
| 11 | Jog Wheel | When the track is stopped, the jog wheel seeks forward and backward in the corresponding track. When the track is playing, the jog wheel speeds up or slows down the track. When scratch mode is enabled, moving the wheel by touching the top surface will scratch, while moving the wheel by touching the outer ring will act as a normal jog-wheel. |
| 12 | PFL (Pre-fade listen) | Selects which track(s) are heard through the headphone output This mapping has two PFL modes. The default is "independent" in which each deck's PFL can be enabled or disabled independently. The alternate mode is "toggle" in which only one deck will be active at a time. Pressing the PFL button on any deck will disable PFL on any other decks automatically. Pressing the already-selected PFL button will disable it. This setting can be toggled by holding both shift buttons and pressing any PFL button. The default mode can be changed in the config section of the M-Audio-Xponent-Advanced-scripts.js file. |
| 13 | Master Output Volume | Controls the volume of the master audio output. Note: This is a hardware control, and changes will not be reflected in the Mixxx UI |
| 14 | Booth Output Volume | Controls the volume of the booth audio output. Note: This is a hardware control, and changes will not be reflected in the Mixxx UI |
| 15 | Shift | Alters the behavior of certain controls. Certain controls have multiple "modes" which can be cycled through by holding both shift keys. These will be mentioned in-line. |
| 16 | Trackpad | Acts as a mouse input to the computer. The Midi mode (see #19) is not mapped at this time. |
| 17 | Left Mouse Button | Used in conjunction with the Trackpad (see #16). |
| 18 | Right Mouse Button | Used in conjunction with the Trackpad (see #16). |
| 19 | MIDI Mode Button | Changes the Trackpad and mouse buttons (See #16, #17, #18) into an X/Y input and two additional note inputs. Note: These MIDI inputs are not used in this mapping. |
| 20 | Channel Kills | The Gain kill (G), will momentarily silence the track entirely. The High (H), Mid (M) and Low (L) kills will cut that frequency band from the output. Holding both shift keys while pressing either gain kill button will toggle the vu meters between master output mode and per-channel mode (see #23). |
| 21 | Brake / Play Backwards | The Big X button is tied to the Brake effect. Releasing the brake before the track has stopped will resume playing, while holding it until the track has stopped completely will leave the track paused. The Big Minus button momentarily plays the corresponding track backwards. Normal play will resume when it is released. Holding the corresponding deck's shift button while pressing the Big Minus button will do a rolling reverse (censor mode), and will resume play at the point the track would have been if the Big Minus had never been pressed. |
| 22 | Gain / EQ | The top knob controls the gain for that deck, while the lower three control the High, Mid, and Low EQ channels. All are soft-takeover enabled. |
| 23 | VU Meters | Displays the current output level for the corresponding deck. Note: This behavior can be switched to behave as a master-out meter instead by setting the value of MaudioXponent.vuMeterMode to 1 in the M-Audio-Xponent-Advanced-scripts.js file, or by holding both shift keys and pressing either gain kill button (see #20). |
| 24 / 25 | Samplers / Effects | The four knobs and buttons below each jogwheel perform different functions. The left-hand side controls the samplers, with the knobs controlling the volume, and the buttons firing off the samples. The right-hand side controls effects. Pressing one of the buttons will give the corresponding effect (1-4) the "focus", and light up accordingly. Once an effect has the focus, pressing the button again will toggle it on and off. The knobs will control the parameters of the effect that currently has the focus. The first three knobs will control the first three parameters for that effect. The fourth knob will always control the wet/dry mix. Any additional effect parameters beyond three will have to be controlled from the Mixx UI. Note: Due to limitations in the 2.0 release of Mixxx, the parameter knobs cannot perform a soft-takeover, so be aware of this if you are using multiple effects. This is expected to change in 2.1 |
| 26 | Nudge | Temporarily speeds up or slows down the corresponding track. These buttons have an alternate "backwards" mode with respect to the Mixxx UI. In this mode the "<" button "nudges" the track to the left (looking at the waveform displays), while ">" slows the track down, "nudging" it to the right. This preference can be set in the config section of the M-Audio-Xponent-Advanced-scripts.js file, or toggled by holding both shift keys and pressing any nudge button. |
| 27 | PFL Mix | Controls the headphone mix. All the way to the left sends only the track(s) selected by the PFL buttons (see #12) to the headphones. All the way to the right sends only the main output to the headphones |
| 28 | Headphone Volume | Controls the volume of the headphones. Note: This is a hardware control, and changes will not be reflected in the Mixxx UI. |
| 29 | Progress meter | Indicates the progress through the corresponding track. At thirty seconds from the end of the track, the progress meter will flash to indicate that the end of the track is approaching. |
| 30 | Seek | Fast-forward and fast-rewind. |
| 31 | Hotcues and Beatgrid | The upper numbered buttons set or activate hotcues. Holding shift while pressing a hotcue button clears that hotcue. The < and > buttons shift the beatgrid left or right and can be used to make minor corrections on the fly. Holding shift while pressing either button will align the beatgrid to the current position. The lock button toggles Keylock on and off for that deck. Holding shift while pressing it toggles Quantize on and off for that deck. The + and - buttons increase or decrease the speed of the corresponding track. |
| 32 | Rate Slider | Affects the speed of the corresponding track. Soft-takeover is enabled for this control, so if you don't typically use the sliders, you can safely "stow" them at either extreme and then reset the track speed using the Mixxx UI. |
| 33 | Channel Volume | Normal function, but with soft-takeover enabled. |
| 34 | Sync | Normal function. Flashes on each beat of the corresponding track. Note: The flashing behavior can be customized by setting the MaudioXponent.syncFlashMode value in the M-Audio-Xponent-Advanced-scripts.js file. 0=No flash, 1=Simple flash, 2=Toggle flash. In Toggle mode, the button will toggle between lit and unlit with each beat. Holding both shift buttons while pressing either Sync button will cycle through the available modes at runtime. |
| 35 | Cue | Normal function. |
| 36 | Loops | The 1, 2, 4, and 8 buttons behave as normal, starting a loop of X beats at the current position. Pressing the same button again while looping will exit that loop. Holding shift while pressing the loop buttons will do a rolling beat loop of 1, 1/2, 1/4, or 1/8th beats, continuing where the song would have been without the loop when they are released. |
| 37 | Play/Pause | Normal function. |
| 38 | Punch-In | Momentarily pulls the cross-fader to the center position while pressed. This only works when the cross-fader is far enough toward the opposite deck, and can be used to momentarily "punch-in" audio from the other deck. |
| 39 | Cross-fader | Normal function, but with soft-takeover enabled. |
 This is the Mixxx Wiki -
 Mixxx is a free and open-source DJ software.
Manual
Hardware Compatibility
Reporting Bugs
Getting Involved
Contribution Guidelines
Coding Guidelines
Using Git
Developer Guide
Creating Skins
Contributing Mappings
Mixxx Controls
MIDI Scripting
Components JS
HID Scripting