13. Nastavitve
Mixxx has many options to customize in .
13.1. Strojna oprema za zvok
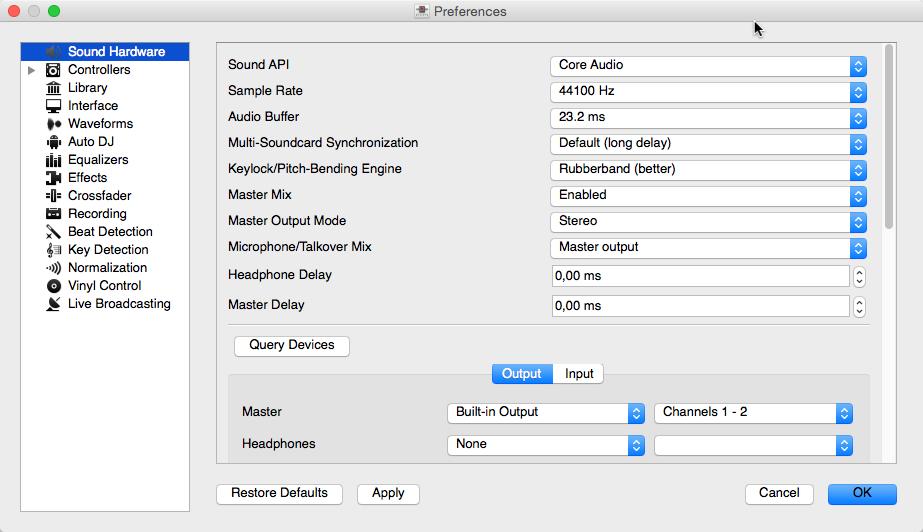
Mixxx nastavitve strojne opreme za zvok
To achieve the best performance with Mixxx it is essential to configure your audio buffer, sample rate, and audio API. These three factors largely determine Mixxx’s responsiveness and reliability. The optimal settings will vary based on your computer and hardware quality.
For information about the different input and output options, refer to Nastavitve vhodnih in izhodnih naprav. The DJ Hardware chapter explains different types of DJ hardware and how to set them up with the input and output options. If you are using a microphone, refer to the Raba mikrofonov chapter.
13.1.1. Zvočni medpomnilnik
The audio buffer is the amount of audio in milliseconds that Mixxx processes at a time. This is a major factor that determines the latency between changing controls in Mixxx such as moving the crossfader or pressing the play button and hearing the audio change. For example, with an audio buffer of 23 ms, it will take approximately 23 milliseconds for Mixxx to stop the audio after you toggle the play button. The actual latency will be longer depending on a variety of factors.
The audio buffer setting determines how quickly your operating system expects Mixxx to react. A smaller audio buffer means Mixxx will be more responsive, but requires a faster CPU and quality audio interface. Setting your audio buffer too small may be too much for your computer and audio interface to handle. In this situation, Mixxx playback will be choppy and very clearly distorted as your system will not be able to keep up with how frequently Mixxx is trying to process audio. It is recommended to set your audio buffer as small as your system can handle reliably without glitches. Experiment with different audio buffer sizes to find what works for your system.
An audio buffer between 23-64 ms is acceptable if you are using Mixxx with a keyboard/mouse or a controller. An audio buffer below 10 ms is recommended when vinyl control is used because Mixxx will feel unresponsive otherwise.
The Adjusting Audio Latency page on the Mixxx Wiki has tips for different operating systems that may help you use a smaller audio buffer reliably.
Opozorilo
Your system may glitch only occasionally if you have your audio buffer set a little too low. This will happen at unpredictable times and you may not notice if you are only doing brief tests of each audio buffer size. When you think you have found a good buffer size for your system, play with Mixxx for at least a half hour before performing to ensure no glitches happen.
13.1.2. Frekvenca vzorčenja
The sample rate setting in Mixxx controls how many samples (chunks of audio) per second are produced by Mixxx. This determines the maximum frequency in Mixxx’s signal, which is half the sample rate. Humans can only hear up to 20 kHz, so there is generally no need to use more than a 44.1 kHz (44100 Hz) sample rate for playback. Most music is published with a 44100 Hz sample rate, and playing music in a different sample rate than the audio file slightly reduces sound quality.
Opozorilo
A sample rate of 96 kHz gives your computer less than half the time to as to do the same processing. Increasing the sample rate will increase CPU usage and likely raise the minimum audio buffer size you can use reliably.
13.1.3. API knjižnica za zvok
The Sound API that Mixxx uses is the method by which Mixxx talks to your operating system in order to deliver audio to your audio interface. Your choice of Sound API can drastically affect Mixxx’s performance on your computer. Therefore it is important to take care to choose the best Sound API available to you.
13.1.3.1. Windows
The following Sound APIs are available on Windows:
ASIO: Good
WDM-KS: Good
WASAPI: Acceptable
DirectSound: Poor
MME: Poor
It is best to use the ASIO Sound API that bypassses the sound processing of the Windows kernel. Using ASIO requires a driver for your audio interface from the manufacturer. Check the manufacturer’s website to see if a driver download is available. Soundcards designed for musicians almost always have an ASIO driver available, but audio interfaces built into computers and very cheap audio interfaces typically do not have an ASIO driver. If there is no ASIO driver available for your audio interface, use the WDM-KS API. There is generally no advantage to using ASIO4ALL, a wrapper around the WDM-KS API.
13.1.3.2. GNU/Linux
The following Sound APIs are available on GNU/Linux:
ALSA: Good
JACK: Good
OSS: Acceptable
ALSA is the simplest sound API to configure. Using ALSA will prevent any other programs from using the audio interface(s) that Mixxx is using.
JACK allows you to route audio between JACK-compatible applications in flexible ways and output sound from multiple programs at the same time. However, JACK can be complicated to set up. Unless you will be connecting Mixxx to other JACK-compatible applications, JACK offers no advantages over ALSA. To use JACK, start the JACK daemon before running Mixxx. Otherwise JACK will not appear as a Sound API in the preferences.
Most modern GNU/Linux distributions use PulseAudio by default. When launched from a GUI menu entry or icon, Mixxx suspends PulseAudio while it is running so that Mixxx can use ALSA directly. Like JACK, PulseAudio allows multiple programs to access one audio interface, but PulseAudio and JACK have opposite design goals. PulseAudio is designed to make ordinary computer usage such as watching videos online and listening to music easy whereas JACK is designed for demanding low latency audio programs like Mixxx. It can be difficult to setup JACK and PulseAudio to work well together. So, unless you already use JACK, it is easiest to let Mixxx suspend PulseAudio and use ALSA.
If the PulseAudio plugin for alsalibs is installed on GNU/Linux, you can
choose the virtual device pulse. This allows Mixxx to share the default
system audio interface with other media players. This only works if you start
Mixxx without pasuspender, which you can do by running mixxx from a
console rather than clicking the launcher icon in a menu or on your desktop.
Since the sound stream is routed from ALSA to Pulse and back to ALSA, this adds
an additional latency of ~2 x the selected audio buffer size.
OSS is an Sound API that predates ALSA. Few modern audio interfaces have OSS drivers.
13.1.3.3. macOS
CoreAudio is the only Sound API on macOS.
13.1.4. Other Sound Hardware options
Multi-Soundcard Synchronization: Mixxx is able to use two or more audio interface at a time, each with its own clock. When multiple audio interfaces are in use, the Mixxx engine is driven by the Master audio interface. Here you can select the synchronization used for the other audio interfaces to avoid buffer overflows or underflows.
Keylock/Pitch-Bending Engine: This allows you to select the engine used for independent tempo and pitch changes (e.g. key lock). Use on lower power machines (such as netbooks) or if you experience buffer underflows while using key lock.
Master Mix: You may disable the master mix to reduce Mixxx’s CPU usage if you do not use the Master output, recording or live broadcasting.
Master Output Mode: In Mono mode, the left and right channel are combined into a mono signal which is passed to both channels of your master audio interface. This is useful for setups where the audience cannot hear your mix in stereo because of speaker placement or playing in a space with lots of reverberation.
Buffer Underflow Count: Underflows (data is not available when needed) indicate that some of the subsystems in Mixxx can’t keep up with real-time deadlines imposed by the current audio buffer size. This is useful to tune the latency settings. If the counter increases, then increase your audio buffer size, decrease the sample rate setting or change the sound API setting if available.
13.2. Knjižnica
13.2.1. Spreminjanje glasbenih direktorijev
Ročno lahko dodate, prevežete ali odstranite Mixxx glasbene direktorije v .
- Dodajanje novega glasbenega direktorija
Mixxx hkrati deluje z večjim številom map glasbene knjižnice. Kliknite Dodaj za brskanje po direktoriju z glasbo. Mixxx bo opazoval ta direktorij in poddirektorije in iskal nove skladbe.
If you add a directory that is already in your library, or you are currently rescanning your library, the operation is canceled.
Directories can also be added from the Computer sidebar item inside the library.
- Ponovno poveži obstoječ glasbeni direktorij
If an existing music directory is moved or renamed, Mixxx doesn’t know where to find the audio files in it. The tracks will still show in library but they can’t be loaded on decks and the tracks will become missing after the library is rescanned.
To relink the music directory, go to , click Relink to select the music directory in its new location. This will re-establish the links to the audio files in the Mixxx library.
Click , this will update the tracks and cause them to show up again in the library, check the location column in the library and you should see that it now points to the new music directory.
The playlists, crates, history and all track data like cue points, rating, comments etc. are preserved after relinking the library, the tracks are also not re-analyzed as the cached analysis is reused. You can confirm this by checking the Key and BPM columns to see if there is a key and BPM for every track.
Opomba
It is recommended to take a backup of your Mixxx configuration files before moving or renaming music directories used in Mixxx. The location of Mixxx configuration files vary based on the operating system:
Windows:
%USERPROFILE%\Local Settings\Application Data\Mixxx\macOS:
Library/Application Support/MixxxLinux: The configuration files are found in the
.mixxxfolder in your home directory.
- Odstrani glasbeni direktorij
Kliknite na Odstrani in Mixxx ne bo več opazoval direktorija in njegovih poddirektorijev iščoč nove skladbe, pred tem pa vo vprašal, kaj želite storiti s skladbami iz tega direktorija.
Izberite Skrij skladbe, če želite skriti vse skladbe iz tega direktorija in njegovih poddirektorijev.
Izberite Izbriši metapodatke za skladbo, če želite, da Mixxx za stalno pobriše vse metapodatke za te skladbe.
Izberite Ohrani skladbe nespremenjene, če želite pustiti skladbe nespremenjene v vaši knjižnici.
Skrivanje skladb ohrani metapodatke za primer, da bi jih v prihodnje ponovno dodali.
Metapodatki so vse podrobnosti o skladbi (umetnik, naslov, število predvajanj, itd.), kot tudi mreže beata, hotcue iztočnice in zanke. Ta izbira se nanaša le na Mixxx knjižnico. Nobena datoteka na disku se ne spremeni ali izbriše.
Nasvet
Ob spreminjanju glasbenih direktorijev ima smisel zagnati ponoven pregled knjižnice. Izberite v menuju.
13.3. Prepoznavanje beata
Mixxx uporablja ultra natančen detektor BPM in beata. Ročni popravki so večinoma odvečni, saj Mixxx ve, kje se nahajajo beati.
Prepoznavanje BPM in beata sta kompleksni operaciji. Glede na vaš računalnik in kakovost skladbe lahko to traja nekaj časa. V osnovi Mixxx analizira celotno skladbo. Za pohitritev prepoznavanja beata na počasnejših račinalnikih je na voljo opcija “Hitra analiza”. Ko je vklopljena, se BPM računa iz analize prve minute skladbe. V večini primerov to ne vpliva negativno, ker je večina današnje glasbe napisane v 4/4 taktu s fiksnim tempom.
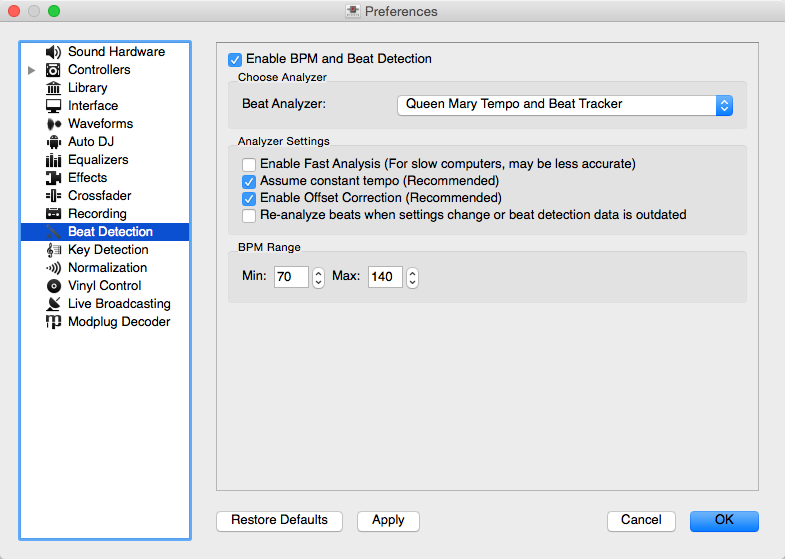
Mixxx nastavitve - BPM nastavitve
Spodnja tabela prikazuje nastavitve za prepoznavanje beata
Opcija |
Opis |
|---|---|
Vključi hitro analizo |
If enabled, BPM will be detected by only using the first minute of audio. |
Predvidi konstantni tempo |
Če je vključen, Mixxx domneva, da so razdalje med beati konstantne. Če je izključen, se prikaže surova mreža beatov, kot jo je zaznal analizator. Slednje je primerno za skladbe s spremenljivim tempom. |
Vklopi korekcijski odmik |
Prepreči, da bi bile oznake beata postavljene napačno. |
Ponovno analizira beate ob spremembi nastavitve ali če so podatki zastareli. |
If enabled, Mixxx over-writes old beat grids from prior versions. Moreover, it will re-analyze the BPM if your beat detection preferences change or BPM data from 3rd party programs are present. |
13.3.1. Korekcija mreže beatov
V določenih primerih prepoznavanje BPM in beatov ne ustvari ustrezne mreže beatov.
Typically, the detected BPM is correct but the analyzer has failed to detect the location of the first beat. Consequently, the beat markers are shifted, i.e. the beat markers are a fixed distance from the true beat. To adjust the beat grid, cue the track before a real beat and click the Beat-grid Adjust button in the Mreža gumbov z opcijami predvajalnika.
Če zaznani BPM ni pravilen, bo tudi mreža beata nepravilna. Odstopanje 0,02 BPM bo povzoročilo odstopanje pri dolgih skladbah (denimo klubskih miksih). Če se to zgodi, je lahko mreža beata nekaj minut videti poravnana, potem pa se bo počasi pojavilo odstopanje. Večinoma je enostavno določiti pravi BPM, samo sledite navodilom spodaj.
Opomba
Če prepoznani BPM ni dovolj natančen, toda zelo blizu celoštevilčni vrednosti, ga poskusite ročno spremeniti v celo število.
13.4. Prepoznavanje tonalitete
Mixxx comes with a high precision musical key detector to help you make smooth mixes by ensuring that your tracks are musically compatible.
13.4.1. Nastavitve analizatorja
Prepoznavanje tonalitete je kompleksna operacija. Glede na zmogljivost računalnika ter kakovost in dolžino skladbe lahko vzame nekaj časa. V osnovi Mixxx analizira celotno skladbo. Za pohitritev prepoznavanja tonov na počasnejših računalnikih je na voljo opcija “Hitra analiza”. Če je vključena, se tonaliteta prepoznava iz prve minute skladbe.

Mixxx nastavitve - Nastavitve tonalitete
Spodnja tabela ponazarja nastavitve za prepoznavanje tonalitete:
Opcija |
Opis |
|---|---|
Vključi hitro analizo |
Če je vključeno, se tonaliteta prepoznava zgolj iz prve minute zvoka. |
Ponovna analiza tonalitete, če se spremenijo nastavitve ali so podatki zastareli. |
Če je vključeno, bo Mixxx ponovno analiziral tonaliteto skladb, kadar izberete drugi vtičnik za prepoznavanje tonalitete ali kadar je tonaliteta bila prepoznana s pomočjo katerega drugega programa. |
Notacija tonalitete |
Spremeni način na katerega so tonalitete prikazane v knjižnici |
13.5. Izravnalniki
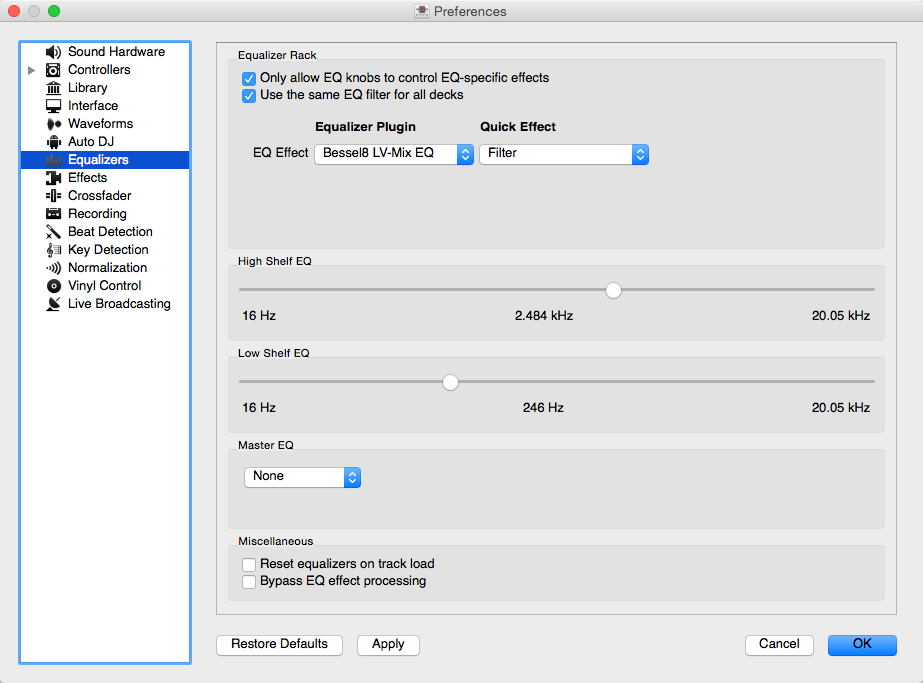
Nastavitve izravnalnika
allows you to setup the equalizers.
Equalizer Rack: The Equalizer Rack is a special effect rack that is connected to the deck’s equalizer and filter controls.
In this section you can select the equalizers and quick effects that are used with the decks.
Equalizer Plugin: Here you can select the effect that is used as the mixing EQ in each deck. By default only built-in equalizers are displayed. Unchecking allows you to select any other effect.
Quick Effect: Here you can select the effect that is controlled by the dedicated filter knob in each deck. By default only built-in filter effects are selected for all decks, but that can be changed as above.
High/Low Shelf EQ: This slider sets the crossover frequencies of the mixing EQ. It controls which frequency range is affected by the low, mid, and high channel EQ knobs. By default the low knob controls the bass and sub bass range up to 246 Hz. The mid knob controls the mid range up to 2.5 kHz. The remaining treble range is controlled by the high knob.
Master EQ: This section allows you to setup an EQ that affects the master output.
13.5.1. Mixing Equalizers
Mixxx offers three types of mixing equalizers with a full kill option. These equalizers are „isolators“, adapted from analog crossover networks. Each EQ is combination of a high shelf filter, a band pass filter, and a low shelf filter. Each EQ type has a unique sound, so try them out to find out which one you prefer.
The Bessel EQs with Lipshitz and Vanderkooy Mix (LV-Mix) do not alter the sound or take any processing time when their knobs are in the center position. They activate once you adjust an EQ knob.
The Linkwitz-Riley EQ on the other hand always applies a minimum, natural sounding phase shift to the sound. Their processing time does not change when you adjust the EQ knobs.
The following table compares some technical parameters:
Vrsta |
cut |
roll-off |
phase shift |
bit perfect |
CPU usage |
|---|---|---|---|---|---|
Bessel4 LV-Mix |
soft |
-24 db/Oct |
linear |
yes |
low |
Bessel8 LV-Mix |
medium |
-48 db/Oct |
linear |
yes |
medium |
Linkwitz-Riley |
sharp |
-48 db/Oct |
minimum |
no |
high |
cut: the frequency response (curve form) at the cross over frequency.
roll-off: The steepness of the EQ bands.
linear phase: No phase distortion, all frequencies are processed with the same group delay.
minimum phase: A natural phase distortion, the group delay changes by the frequency.
bit perfect: Whether the EQ leaves the original samples untouched when the EQ is at unity.
CPU usage: Processing time needed to calculate the EQ output.