2. Kako začeti
2.1. Zagon Mixxx
![]() Once you’ve installed Mixxx, start by
opening Mixxx and importing your music to the Mixxx library.
Once you’ve installed Mixxx, start by
opening Mixxx and importing your music to the Mixxx library.
- Windows
Dvokliknite Mixxx ikono na namizju, poiščite Mixxx v Windows start menuju ali poiščite
Mixxx.exe.- Mac OSX
Double-click the Mixxx icon in the
Applicationsfolder. Alternatively, drag the Mixxx icon to the dock and double-click it there or search for mixxx in Spotlight.- GNU/Linux
Click the Mixxx icon in the applications menu or launcher of your desktop environment or perform a search for
mixxx. Alternatively type mixxx into the terminal, then hit Return. If your audio interface is not accessible from Mixxx because it is used by other applications via PulseAudio, you may close and restart Mixxx using pasuspender mixxx. See Launching Mixxx from the Command Line for an overview of Mixxx’s command line options.
2.2. Uvoz zvočnih datotek
Mixxx running on Windows 10 - Choose music library directory dialog
Ko je Mixxx prvič zagnan, vpraša za lokacijo direktorija, kjer je shranjena vaša glasba. V odnovi za dialog kaže na lokacijo, kjer so glasbene datoteke ponavadi shranjene, lahko pa izberete drugo lokacijo na vašem računalniku.
Click Select Folder and Mixxx will scan your music library. Depending on the size of your library this could take some time. All the supported music files Mixxx detects will be listed in the Tracks - View and edit your whole collection.
Če želite osvežiti vašo knjižnico (ker ste denimo dodali ali premaknili kakšne datoteke), lahko to storite z izbiro opcije iz menuja. Če želite knjižnico osvežiti ob vsakem zagonu, izberite .
Opozorilo
V Windows 7 in 8 dialog za uvoz kaže na Windows glasbeno knjižnico, ki je posebna mapa. Teh virtualnih imenikov ne morete uporabljati. Namesto tega uporabite navadno mapo, ponavadi je to “My Music“, kot je prikazano na zgornji sliki.
2.3. Analizira vašo knjižnico
 Mixxx automatically analyzes tracks the first time you load
them in a deck. This allows you to run beatgrid, key, and ReplayGain detection on tracks in advance. It also prepares the waveform overviews, detects file corruption, and calculates the BPM values.
Mixxx automatically analyzes tracks the first time you load
them in a deck. This allows you to run beatgrid, key, and ReplayGain detection on tracks in advance. It also prepares the waveform overviews, detects file corruption, and calculates the BPM values.
Poglej Tudi
For more information, go to Prepoznavanje beata.
2.3.1. Why you should analyze your audio files
If the tracks have never been played with Mixxx before, the library columns BPM, Duration and Key will be empty or unreliable (because the values are just read from the file’s tags if present and might be wrong). Pre-generating beatgrids gives you the chance to double-check the beat markers to make sure they are correct. Errors in beatgrids can cause difficulty when syncing tracks. Furthermore, track analysis takes considerable CPU power and might cause skips in the audio — things you surely don’t need while performing.
2.3.2. How to analyze your audio files
Once you have imported your music library, press OK on the Preferences window.
Go to the Analyze view on the left side panel of the library.
To analyze a few specific tracks, hold down the Ctrl button, and select the tracks that you want to analyze or you can shift-select a range of tracks. Once they’ve been highlighted, click the Analyze button on the top right of the library section.
To analyze the newly added tracks, toggle the New label and then click Analyze.
To analyze the entire library, toggle the All label and then click Analyze.
The New and All toggle buttons are located at the top left of the analysis pane - just above the Preview and Cover Art column titles of the library.
While analyzing, the progress in percentage and total queue length are shown.
2.4. Nastavitve vhodnih in izhodnih naprav
Before you can start using Mixxx, you need to configure Mixxx to use your sound hardware in . You do not need to configure all inputs and outputs.
The DJ Hardware chapter explains different types of DJ hardware and how to set them up with the input and output options. For Mixxx to perform the best it can on your system, configure the other Strojna oprema za zvok preferences in addition to the inputs and outputs.
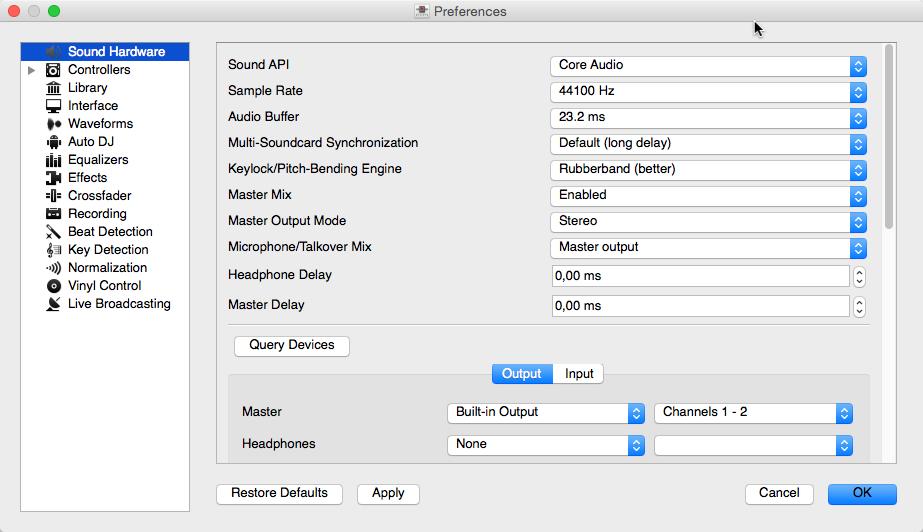
Mixxx nastavitve strojne opreme za zvok
2.4.1. Output Options
Notranje miksanje:
Use these outputs if you are not using an external hardware mixer. If you are using a controller with a built-in audio interface, use these outputs.
Master: all decks, samplers, microphones, and auxiliary inputs mixed together. This output is sent to the speakers for the audience.
Headphones: all decks, samplers, microphones, and auxiliary inputs assigned to pre-fader listening
Booth: same as Master output, but has a separate gain control
Zunanje miksanje:
Decks 1-4: the individual unmixed decks to send to an external mixer
Bus Left/Center/Right: all decks, samplers, and auxiliary inputs assigned to each side of Mixxx’s crossfader
2.4.2. Input Options
Notranje miksanje:
Use these inputs if you are not using an external hardware mixer. If you are using a controller with a built-in audio interface, use these inputs.
Microphone 1-4: live microphone or musical instrument inputs
Auxiliary 1-4: other sound sources
Zunanje miksanje:
Record/Broadcast: When this is configured, Mixxx will record and broadcast from this audio interface input instead of the internal master mix. If you have a microphone plugged into the mixer, do not configure the Microphone 1-4 inputs.
Either internal or external mixing:
Vinyl Control 1-4: timecode input from turntables or CDJs for manipulating decks 1-4
Poglej Tudi