4. Mixxx Setup
4.1. Lancer Mixxx
![]() Once you’ve installed Mixxx, start by opening
Mixxx and importing your music to the Mixxx library.
Once you’ve installed Mixxx, start by opening
Mixxx and importing your music to the Mixxx library.
- Windows
Double-cliquez sur l’icône Mixxx sur votre bureau. Vous pouvez aussi naviguer dans le menu démarrer de Windows et cliquer sur l’icône Mixxx, ou faire une recherche du fichier
Mixxx.exe.- Mac OSX
Double-click the Mixxx icon in the
Applicationsfolder. Alternatively, drag the Mixxx icon to the dock and double-click it there or search for mixxx in Spotlight.- GNU/Linux
Click the Mixxx icon in the applications menu or launcher of your desktop environment or perform a search for
mixxx. Alternatively type mixxx into the terminal, then hit Return. If your soundcard is not accessible from Mixxx because it is used by other applications via PulseAudio, you may close and restart Mixxx using pasuspender mixxx. See Command line options for an overview of Mixxx’s command line options.
4.2. Préférences du matériel sonore
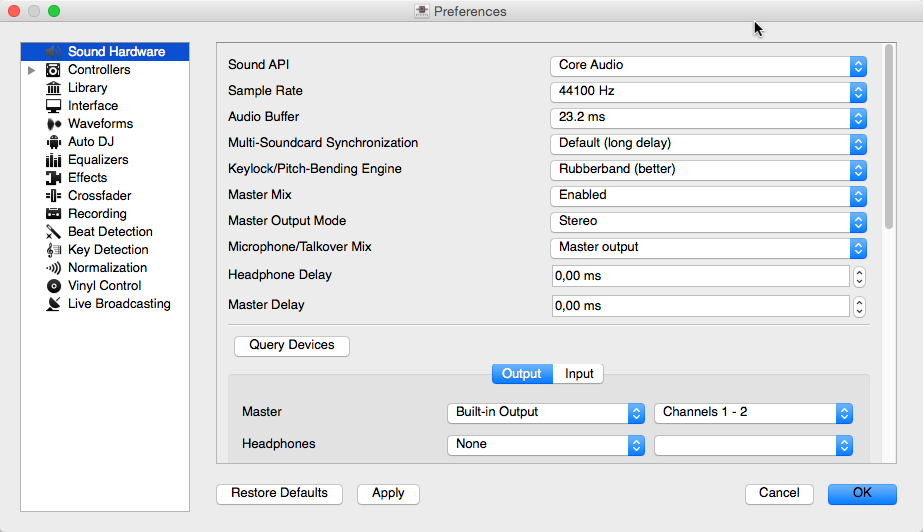
Préférences du matériel audio de Mixxx
allows you to select the audio inputs and outputs to be used.
Sound API: Depending on your Operating System, select the API that Mixxx uses to deliver audio to your audio device. Your choice can drastically affect how well Mixxx performs on your computer.
Fréquence d’échantillonnage : Vous permet de sélectionner manuellement la fréquence d’échantillonnage pour l’entrée audio. La fréquence d’échantillonnage doit être positionnée à la même valeur que la fréquence d’échantillonnage de votre interface audio. Par défaut, Mixxx essaye en premier lieu d’utiliser la valeur par défaut du système, qui est le plus probablement 44.1kHz. Sinon, Mixxx utilisera une valeur différente.
Audio buffer: Also known as latency, this is the lag time in milliseconds that it takes for Mixxx to process your input. Lower latency means Mixxx will be more responsive but on slower computers and cheaper sound cards it might cause glitches.
Multi-Soundcard Synchronization: Mixxx is able to use two or more soundcards at a time, each with its own clock. When multiple soundcards are in use, the Mixxx engine is driven by the Master soundcard. Here you can select the synchronization used for the other soundcards to avoid buffer overflows or underflows.
Keylock/Pitch-Bending Engine: This allows you to select the engine used for independent tempo and pitch changes (e.g. keylock). Use on lower power machines (such as netbooks) or if you experience buffer underflows while using keylock.
Master Mix: You may disable the master mix to reduce Mixxx’s CPU usage if you do not use the Master output, recording or live broadcasting.
Master Output Mode: In Mono mode, the left and right channel are combined into a mono signal which is passed to both channels of your master sound card. This is useful for setups where you can only hear the right or the left speaker.
Microphone/Talkover Mix: This setting controls whether microphone outputs are mixed into the Master output or only into the broadcasting output. This is useful for preventing echo in broadcasting setups.
Headphone/Master Delay: This setting allows you to compensate for the delay between what you hear in your headphones and the master speakers.
Switch to mono mode (see above).
Listen to your headphones with one ear and the master speakers with the other ear.
Adjust the delays until the sound seems to be centered and the stereo effect is gone.
Switch back to stereo mode.
Buffer Underflow Count: Underflows (data is not available when needed) indicate that some of the subsystems in Mixxx can’t keep up with real-time deadlines imposed by the current audio buffer size. This is useful to tune the latency settings. If the counter increases, then increase your audio buffer size, decrease the sample rate setting or change the sound API setting if available.
4.3. Sorties Audio
Mixxx’s mixing engine can be used in two ways:
- Mode de mixage interne
In this mode, Mixxx performs the mixing of the decks, microphone, and samplers in software and outputs them to a single output. To enable internal mixer mode, assign a valid audio output to the Master output in .
Le mode interne est utilisé dans les configurations suivantes :
- Mode de Mixage Externe
In this mode, Mixxx outputs the audio from each deck to a separate soundcard output. This allows you to route the deck outputs through a hardware mixer. To enable external mixer mode, select a valid audio output for the Deck outputs in .
Le mode externe est utilisé dans la configuration suivante :
4.3.1. Sortie Casque
In both internal and external mixer mode, you can choose a headphone output for pre-fader listening or headphone cueing in . This allows you to listen and synchronize the track you will play next in your headphones before your audience hears the track. See also PFL/Headphone Button.
4.4. Latence, Fréquence d’échantillonnage et API Audio
To achieve the best performance with Mixxx it is essential to configure your audio buffer, sample rate, and audio API. These three factors largely determine Mixxx’s responsiveness and audio quality and the optimal settings will vary based on your computer and hardware quality.
4.4.1. Tampon audio
The audio buffer, also known as latency, is the lag time in milliseconds that it takes for Mixxx to process your input (turning knobs, sliding the crossfader, etc.). For example, with an audio buffer of 36 ms, it will take approximately 36 milliseconds for Mixxx to stop the audio after you toggle the play button. Additionally, the audio buffer setting determines how quickly your Operating System expects Mixxx to react. A smaller audio buffer means Mixxx will be more responsive. On the other hand, setting your audio buffer too low may be too much for your computer and sound card to handle. In this situation, Mixxx playback will be choppy and very clearly distorted as your computer will not be able to keep up with how frequently Mixxx is processing audio.
An audio buffer between 36-64 ms is acceptable if you are using Mixxx with a keyboard/mouse or a controller. An audio buffer below 10 ms is recommended when vinyl control is used because Mixxx will feel unresponsive otherwise.
Gardez à l’esprit que une latence plus faible nécessite une meilleure carte son et un CPU plus rapide et qu’un logiciel de mixage avec une latence zéro est un mythe (bien que Mixxx est capable de fonctionner en dessous de 1 ms).
4.4.2. Fréquence d’échantillonnage
The sample rate setting in Mixxx controls how many samples per second are produced by Mixxx. This determines the maximum frequency in Mixxx’s signal, which is half the sample rate. Humans can only hear up to 20 kHz, so there is generally no need to use more than a 44.1 kHz (44100 Hz) sample rate for playback. Most music is published with a 44100 Hz sample rate.
Avertissement
A sample rate of 96kHz takes Mixxx over twice as long to compute. Keep in mind that increasing the sample rate will increase CPU usage and likely raise the minimum audio buffer size you can use.
4.4.3. API Audio
L” API Audio que Mixxx utilise est la méthode par laquelle Mixxx parle à votre Système d’exploitation pour délivrer l’audio à votre carte son. Votre choix d’API Audio peut drastiquement impacter les performances de Mixxx sur votre ordinateur. C’est pourquoi il est important de choisir la meilleure API Audio disponible avec soin. Reportez-vous au tableau des API Audio suivant pour vérifier quel est le meilleur choix pour votre système d’exploitation.
API Audio / OS |
Qualité |
|---|---|
Windows / ASIO |
Bon |
Windows / WDM-KS |
Bon |
Windows / WASAPI |
Acceptable |
Windows / DirectSound |
Médiocre |
Windows / MME |
Médiocre |
Mac OS X / CoreAudio |
Bon |
GNU Linux / ALSA |
Bon |
GNU Linux / JACK (Avancé) |
Bon |
GNU Linux / OSS |
Acceptable |
For low latency on Windows, it is best to use an ASIO driver that bypassses the sound processing of the Windows kernel. If there is no such ASIO driver available for your soundcard, use the WDM-KS API. There is generally no advantage to using ASIO4ALL, a wrapper around the WDM-KS API.
On GNU/Linux, ALSA is the simplest sound API to configure. Using ALSA will prevent any other programs from using the sound card(s) that Mixxx is using.
JACK allows you to route audio between JACK-compatible applications in flexible ways and output sound from multiple programs at the same time. However, JACK can be complicated to set up. To use JACK, start the JACK daemon before running Mixxx. Otherwise JACK will not appear as a Sound API in the preferences.
Most modern GNU/Linux distributions use PulseAudio by default. When launched from a GUI menu entry or icon, Mixxx suspends PulseAudio while it is running so that Mixxx can use ALSA directly. Like JACK, PulseAudio allows multiple programs to access one sound card, but PulseAudio and JACK have opposite design goals. PulseAudio is designed to make ordinary computer usage such as watching videos online and listening to music easy whereas JACK is designed for demanding low latency audio programs like Mixxx. It can be difficult to setup JACK and PulseAudio to work well together. So, unless you already use JACK, it is easiest to let Mixxx suspend PulseAudio and use ALSA.
If the PulseAudio plugin for alsalibs is installed on GNU/Linux, you can
choose the virtual device pulse. This allows Mixxx to share the default
system sound card with other media players. This only works if you start
Mixxx without pasuspender, which you can do by running mixxx from a
console rather than clicking the launcher icon in a menu or on your desktop.
Since the sound stream is routed from ALSA to Pulse and back to ALSA, this adds
an additional latency of ~2 x the selected audio buffer size.
4.5. Equalizer Preferences
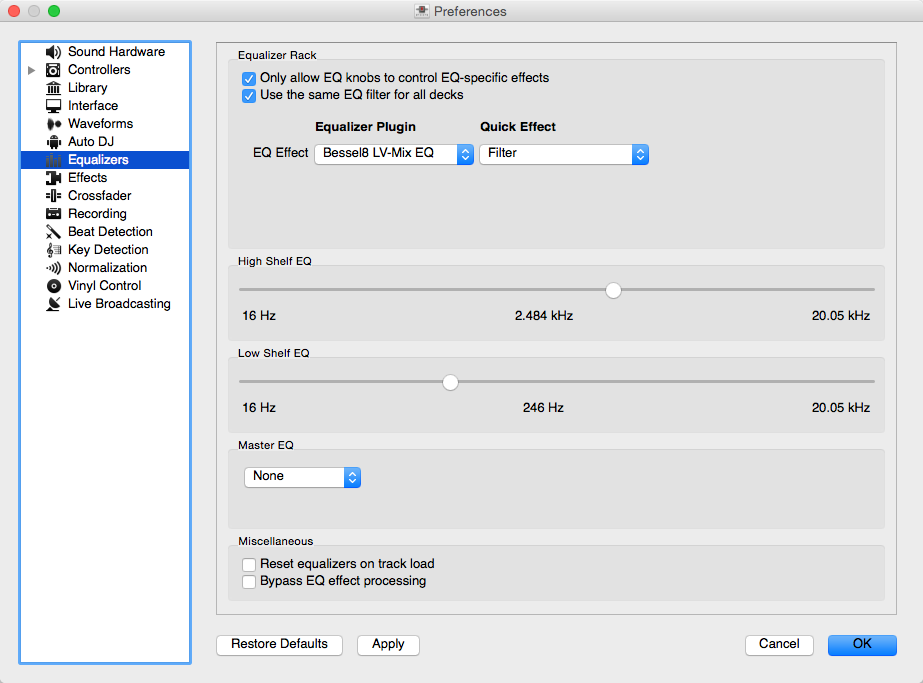
Equalizer Preferences
allows you to setup the equalizers.
Equalizer Rack: The Equalizer Rack is a special effect rack that is connected to the deck’s equalizer and filter controls.
In this section you can select the equalizers and quick effects that are used with the decks.
Equalizer Plugin: Here you can select the effect that is used as the mixing EQ in each deck. By default only built-in equalizers are displayed. Unchecking allows you to select any other effect.
Quick Effect: Here you can select the effect that is controlled by the dedicated filter knob in each deck. By default only built-in filter effects are selected for all decks, but that can be changed as above.
High/Low Shelf EQ: This slider sets the crossover frequencies of the mixing EQ. It controls which frequency range is affected by the low, mid, and high channel EQ knobs. By default the low knob controls the bass and sub bass range up to 246 Hz. The mid knob controls the mid range up to 2.5 kHz. The remaining treble range is controlled by the high knob.
Master EQ: This section allows you to setup an EQ that affects the master output.
4.5.1. Mixing Equalizers
Mixxx offers three types of mixing equalizers with a full kill option. These equalizers are « isolators », adapted from analog crossover networks. Each EQ is combination of a high shelf filter, a band pass filter, and a low shelf filter. Each EQ type has a unique sound, so try them out to find out which one you prefer.
The Bessel EQs with Lipshitz and Vanderkooy Mix (LV-Mix) do not alter the sound or take any processing time when their knobs are in the center position. They activate once you adjust an EQ knob.
The Linkwitz-Riley EQ on the other hand always applies a minimum, natural sounding phase shift to the sound. Their processing time does not change when you adjust the EQ knobs.
The following table compares some technical parameters:
Type |
cut |
roll-off |
phase shift |
bit perfect |
CPU usage |
|---|---|---|---|---|---|
Bessel4 LV-Mix |
soft |
-24 db/Oct |
linear |
yes |
low |
Bessel8 LV-Mix |
medium |
-48 db/Oct |
linear |
yes |
medium |
Linkwitz-Riley |
sharp |
-48 db/Oct |
minimum |
no |
high |
cut: the frequency response (curve form) at the cross over frequency.
roll-off: The steepness of the EQ bands.
linear phase: No phase distortion, all frequencies are processed with the same group delay.
minimum phase: A natural phase distortion, the group delay changes by the frequency.
bit perfect: Whether the EQ leaves the original samples untouched when the EQ is at unity.
CPU usage: Processing time needed to calculate the EQ output.
4.6. Importer ses fichiers audio
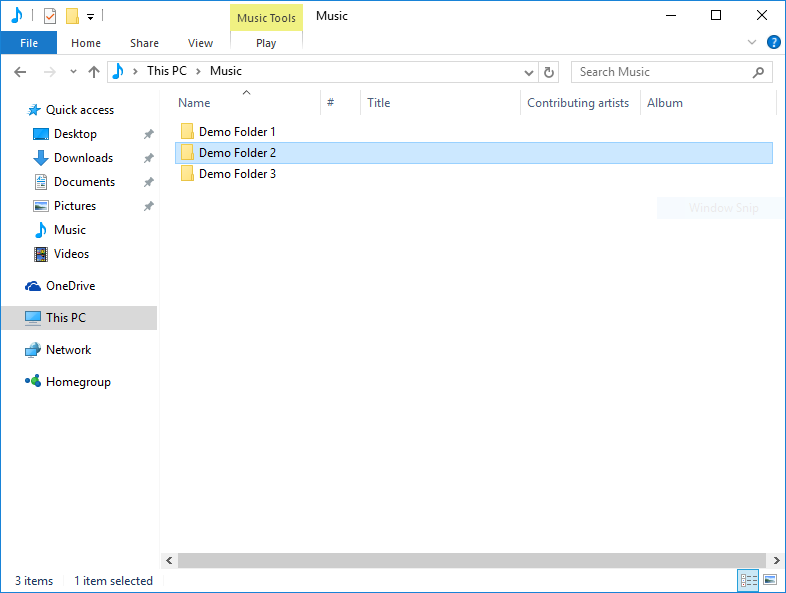
Mixxx running on Windows 10 - Choose music library directory dialog
- Configuration de la bibliothèque musicale
The first time you run Mixxx, you are asked to select a directory where your music is stored. By default, the dialog points to a location where music files are typically held, but you can select any location on your computer.
Cliquez sur Select Folder et Mixxx va examiner votre bibliothèque musicale. Ceci peut prendre du temps en fonction de la taille de votre bibliothèque. Tous les fichiers musicaux pris en charge que Mixxx détecte seront listés dans Library - View and edit your whole collection.
SI vous voulez rafraîchir votre bibliothèque (par exemple parce que vous avez ajouté ou déplacé des fichiers), vous pouvez le faire avec dans le menu. SI vous souhaitez réanalyser la bibliothèque à chaque démarrage, sélectionnez .
Avertissement
Sur Windows 7 et 8, la boîte de dialogue d’import pointe vers votre bibliothèque Windows “Musique“, un dossier virtuel dédié. Vous ne pouvez pas utiliser ces dossiers virtuels. Utilisez plutôt un dossier classique, habituellement “Ma Musique“, comme vu ci-dessus.
Formats de fichiers compatibles
Nouveau dans la version 2.0: Prise en charge du format audio Opus.
Mixxx supports a variety of audio file formats: Wave (wav), Aiff (aiff, aif), MP3 (mp3), Ogg Vorbis (ogg), FLAC (flac), Opus (opus), and AAC (aac, m4a) if supported by your OS. DRM protected files, such as m4p files purchased in the iTunes Store, are not supported.
AAC (M4A) is supported on Windows Vista and Mac OS X 10.5 onwards. The Platform Update Supplement is required for Windows Vista.
On Linux, AAC playback is disabled by default due to licensing restrictions. To enable the playback of AAC files, build Mixxx from source with m4a/AAC files support.
- Importer des bibliothèques externes
Si iTunes, Traktor, Rhythmbox ou Banshee sont installés sur votre ordinateur, Mixxx vous permet d’accéder à vos pistes et listes de lecture dans la bibliothèque Mixxx, voir iTunes, Traktor, Rhythmbox, Banshee - Using external libraries.
- Importer des fichiers distants
Pour importer des fichiers audio qui ne sont pas dans le répertoire de votre bibiothèque musicale, faites-les glisser directement depuis un gestionnaire de fichiers ou depuis la ref:section Parcourir <library-browse>. Importer des fichiers vers Mixxx ne modifie pas leur emplacement sur le disque dur.
Note
Vous ne pouvez pas faire glisser des dossiers entiers vers la bibliothèque parce que Mixxx ne peut actuellement pas analyser récursivement des dossiers pour trouver des fichiers musicaux compatibles.
- Importer des listes de lecture
Vous pouvez importer des listes de lecture existantes depuis d’autres produits que Mixxx aux formats
m3u,pls,m3u8,pls, voir Playlists - Arranging tracks in a set order.- Importer de la musique depuis des CDs
Mixxx ne peut pas lire de la musique depuis des CDs audio. Convertissez le contenu vers des fichiers compatibles en bonne qualité et ajoutez-les à la bibliothèque Mixxx. Voir https://en.wikipedia.org/wiki/Ripping
4.7. Changer de répertoires de musique
Nouveau dans la version 2.0: Prend en charge plusieurs dossiers de bibliothèque musicale et ajoute une option pour les déplacer vers un autre emplacement sans perte de données.
Vous pouvez manuellement ajouter, rediriger et retirer des répertoires musicaux de Mixxx dans .
- Ajouter un nouveau répertoire de musique
Mixxx peut gérer plusieurs dossiers de bibliothèques musicales. Cliquez sur Ajouter pour naviguer jusqu’à un dossier dans lequel votre musique est stockée. Mixxx surveillera ce répertoire et ses sous-répertoires pour y détecter de nouveaux morceaux.
Si vous ajoutez un répertoire qui est déjà dans votre bibliothèque, ou que Mixxx êtes en train d’analyser votre bibliothèque <library-root>`, l’opération est annulée.
Les répertoires peuvent aussi être ajoutés depuis le bouton de la barre latérale Parcourir dans la bibliothèque.
- Rattacher un répertoire musical existant
Si un répertoire de musique est déplacé, Mixxx ne sait plus où trouver les fichiers audio qu’ils contenait. Choisissez Rattacher pour sélectionner le nouvel emplacement de votre répertoire de musique. Ceci ré-établira les liens vers les fichiers audio dans la bibliothèque Mixxx.
- Enlever un répertoire de musique
Cliquez Enlever, et Mixxx ne surveillera plus les nouvelles pistes dans le dossier et ses sous-dossiers, et vous demandera ce que vous souhaitez faire des pistes contenues dans ces répertoires.
Sélectionnez Cacher les pistes pour cacher toutes les pistes de ce répertoire et de ses sous-répertoires.
Sélectionnez Supprimer les métadonnées de la piste pour supprimer définitivement de Mixxx toutes les métadonnées de ces pistes
Sélectionnez Ne pas Modifier les Pistes pour laisser les pistes inchangées dans votre bibliothèque.
Cacher les pistes sauvegarde leur métadonnées au cas où vous les ré-ajouteriez plus tard.
Les métadonnées regroupent tous les détails de la piste (artiste, titre, nombre de lectures, etc…) ainsi que les grilles rythmiques, les points d’arrêt et les boucles. Ce choix n’affecte que la bibliothèque de Mixxx. Aucun fichier sur disque ne sera modifié ou supprimé.
Indication
Lorsque vous modifiez les répertoires de musique, il est recommandé de réanalyser votre bibliothèque à l’issue des modifications. Sélectionnez dans le menu.
4.8. Removing tracks from the library
Removing tracks from the Mixxx library will not physically delete them from your drive. However it does delete extra metadata Mixxx might have (such as hotcues and the beatgrids), and removes links to playlists or crates.
Click the Library item in the sidebar.
Find and select the tracks you want to remove, perform a right-click on them and select Hide from Library from the context menu.
Expand the Library item in the sidebar and click on the Hidden tracks sub-item. All tracks that were set to be hidden from the library will appear here.
Select the tracks you want to remove, or use the Select All button.
To confirm you want to permanently remove these tracks from the library, click Purge.
Indication
If you later decide to add some of the deleted tracks back, import them to the Mixxx library again, see Importer ses fichiers audio.
4.9. BPM and Beat Detection Preferences
À faire
Update this section to explain the differences between the beatgrid and beatmap options.
Mixxx uses an ultra-precise BPM and beat detector. Manual adjustments are redundant in many cases because Mixxx knows where the beats are.
4.9.1. Paramètres de l’analyseur
BPM and beat detection is a complex operation. Depending on your computer and the track’s bitrate and duration this may take some time. By default Mixxx analyzes the complete track. To accelerate beat detection on slower computers, a “Fast Analysis” option is available. If enabled, the BPM is computed by analyzing the first minute of the track. In most cases this does not affect the beat detection negatively because most of today’s dance music is written in a 4/4 signature with a fixed tempo.
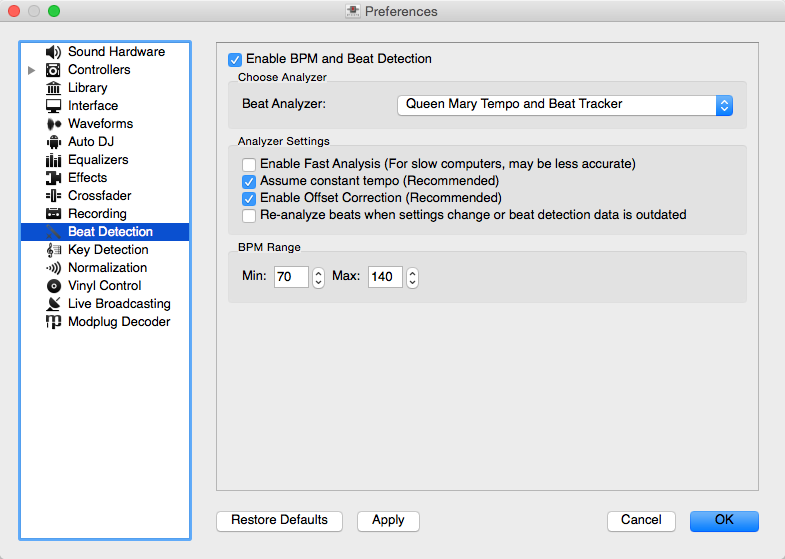
Mixxx preferences - BPM settings
The table below summarizes the beat detection settings:
Option |
Description |
|---|---|
Enable Fast Analysis |
If enabled, BPM will be detected by only using the first minute of audio. |
Assume constant tempo |
If enabled, Mixxx assumes that the distances between the beats are constant. If disabled, the raw beat grid obtained by the analyzer is presented. The latter is appropriate for tracks with variable tempo. |
Enable Offset Correction |
Prevents beat markers from being placed incorrectly. |
Re-analyser le rythme lors de changements de réglages ou quand les informations de détection rythmique sont anciennes |
If enabled, Mixxx over-writes old beat grids from prior versions. Moreover, it will re-analyze the BPM if your beat detection preferences change or BPM data from 3rd party programs are present. |
4.9.2. Correcting Beat Grids
There may be situations where BPM and beat detection do not result in a proper beat grid.
Typically, the detected BPM is correct but the analyzer has failed to detect the location of the first beat. Consequently, the beat markers are shifted, i.e. the beat markers are a fixed distance from the true beat. To adjust the beat grid, cue the track before a real beat and click the Beat-grid Adjust button in the Deck Options Button Grid.
If the detected BPM is not accurate, the corresponding beat grid will also be inaccurate. A deviation of 0.02 BPM units from the correct BPM will cause beatgrid alignment issues on long tracks (e.g. a club mix). If this happens, your beatgrid may look aligned for the few minutes but you will notice a slight drift as the song goes on. Finding the correct BPM is easy in many cases - just follow the note below.
Note
If the detected BPM value is not sufficiently accurate but very close to an integer value, try to set the BPM value manually to the integer.
4.10. Key Detection Preferences
Mixxx comes with a high precision musical key detector to help you make smooth mixes by ensuring that your tracks are musically compatible.
4.10.1. Paramètres de l’analyseur
Key detection is a complex operation. Depending on your computer and the track’s bitrate and duration this may take some time. By default Mixxx analyzes the complete track. To accelerate key detection on slower computers, a “Fast Analysis” option is available. If enabled, the key is computed by analyzing the first minute of the track.
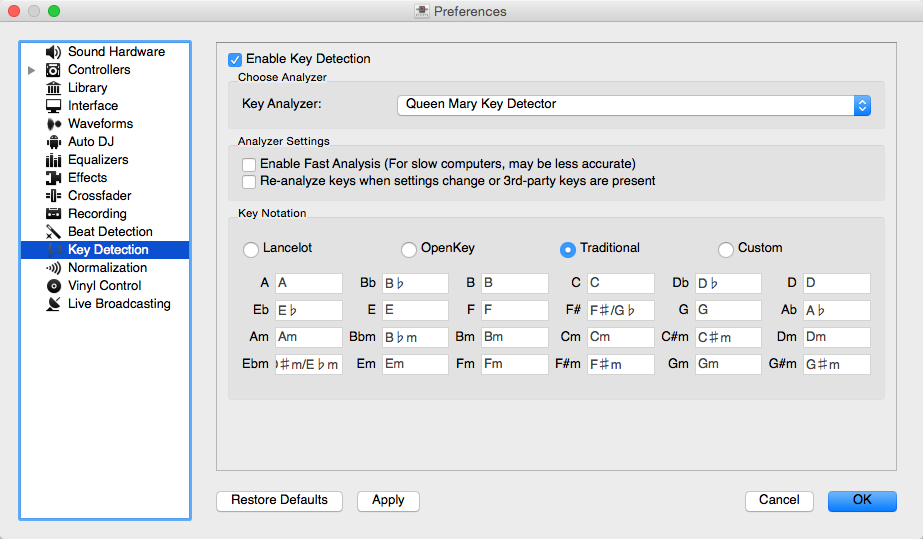
Mixxx preferences - Key settings
The table below summarizes the Key detection settings:
Option |
Description |
|---|---|
Enable Fast Analysis |
If enabled, the key will be detected by using only the first minute of audio. |
Re-analyze key when settings change or Key detection data is outdated |
If enabled, Mixxx will re-analyse tracks if you select a different key detection plugin or the key was generated by a program other than Mixxx. |
Notation de la clé |
Change the way keys are displayed in the library. |
4.11. Analyze your library
 Mixxx automatically analyzes tracks the first time you load
them in a deck, nevertheless it is recommended that you analyze them before
playing live to ensure the beatgrids are correct. Furthermore, track
analysis takes considerable CPU power and might cause skips in the audio —
things you surely don’t need while performing.
Mixxx automatically analyzes tracks the first time you load
them in a deck, nevertheless it is recommended that you analyze them before
playing live to ensure the beatgrids are correct. Furthermore, track
analysis takes considerable CPU power and might cause skips in the audio —
things you surely don’t need while performing.
Once you have configured your music directories and your BPM and key detection settings, press OK on the Preferences window. Go to the Analyze view on the left side panel of the library. This allows you to run beatgrid, key, and ReplayGain detection on tracks in advance. While analyzing, the progress in percentage and total queue length are shown.
Nouveau dans la version 2.0: Drag and drop tracks from the library or external file managers onto the analysis view to instantly analyze these files. The title changes to Analyze (x/y) where x is the number of tracks that have been analyzed so far and y is the total number of tracks originally in the queue.
Modifié dans la version 2.0: Does not generate waveforms to save disk space.
The Analyze features in detail:
All / New radio-buttons: Allows you to view a list of either all tracks in the library or tracks added to the library within the last 7 days.
Select All button: Selects all tracks in the current view.
Analyze button: Starts the detection on the selected tracks.
Voir aussi
For more information, go to BPM and Beat Detection Preferences.