Roland DJ 505
The Roland DJ-505 is an all-in-one USB MIDI controller with an integrated audio interface. It has controls for 2 decks that can be toggled between decks to play with 4 decks. It also features a TR-S step sequencer with sounds from the TR-808 and the TR-909 drum machines (TR-606 and TR-707 are available via firmware update).
- Manufacturer's product page
- Serato DJ Hardware Page
- Owner's Manual
- Driver/Firmware/TR-S Samples Download Page
- Mapping Forum Thread
- Mapping Git Repository
You can download the latest Windows & MacOS drivers and firmware from the manufacturer's website. Since the DJ-505 is a USB class compliant MIDI and audio device, the device is plug-and-play on Linux.
The mapping relies on the following channel assignments (for line/phono input support, applying effects to the TR-S output, etc.):
| Output | |
|---|---|
| Channels | Assigned to |
| 1-2 | Master |
| 3-4 | Headphones |
| Input | |
| Channels | Assigned to |
| 1-2 (CH 1 Line/Phono) | Vinyl Control 1 |
| 3-4 (CH 2 Line/Phono) | Vinyl Control 2 |
| 5-6 (Mix) | Record/Broadcast |
| 7-8 (TR-S output) | Auxiliary 1 |
The microphone, TR-S drum machine, and external inputs are mixed together in input channels 5-6, so Mixxx can record and broadcast them.
The knobs for MASTER LEVEL, BOOTH LEVEL, PHONES VOLUME, MIC LEVEL, TR/SAMPLER LEVEL and CUE/MASTER MIXING are controlling the hardware mixer of the built-in audio interface. Hence, turning the knobs will not change values in the Mixxx GUI and you'll need to set them to their default values when using the controller:

Note: You should assign the Vinyl Control input channels even if you do not intend to use timecode vinyl. These channel assignments are also needed to make the CH 1/2 PC/LINE/PHONO switches work (i. e. passing through line or phono input to the left/right deck).
A mapping has been added to Mixxx prior to the 2.3.0 release.
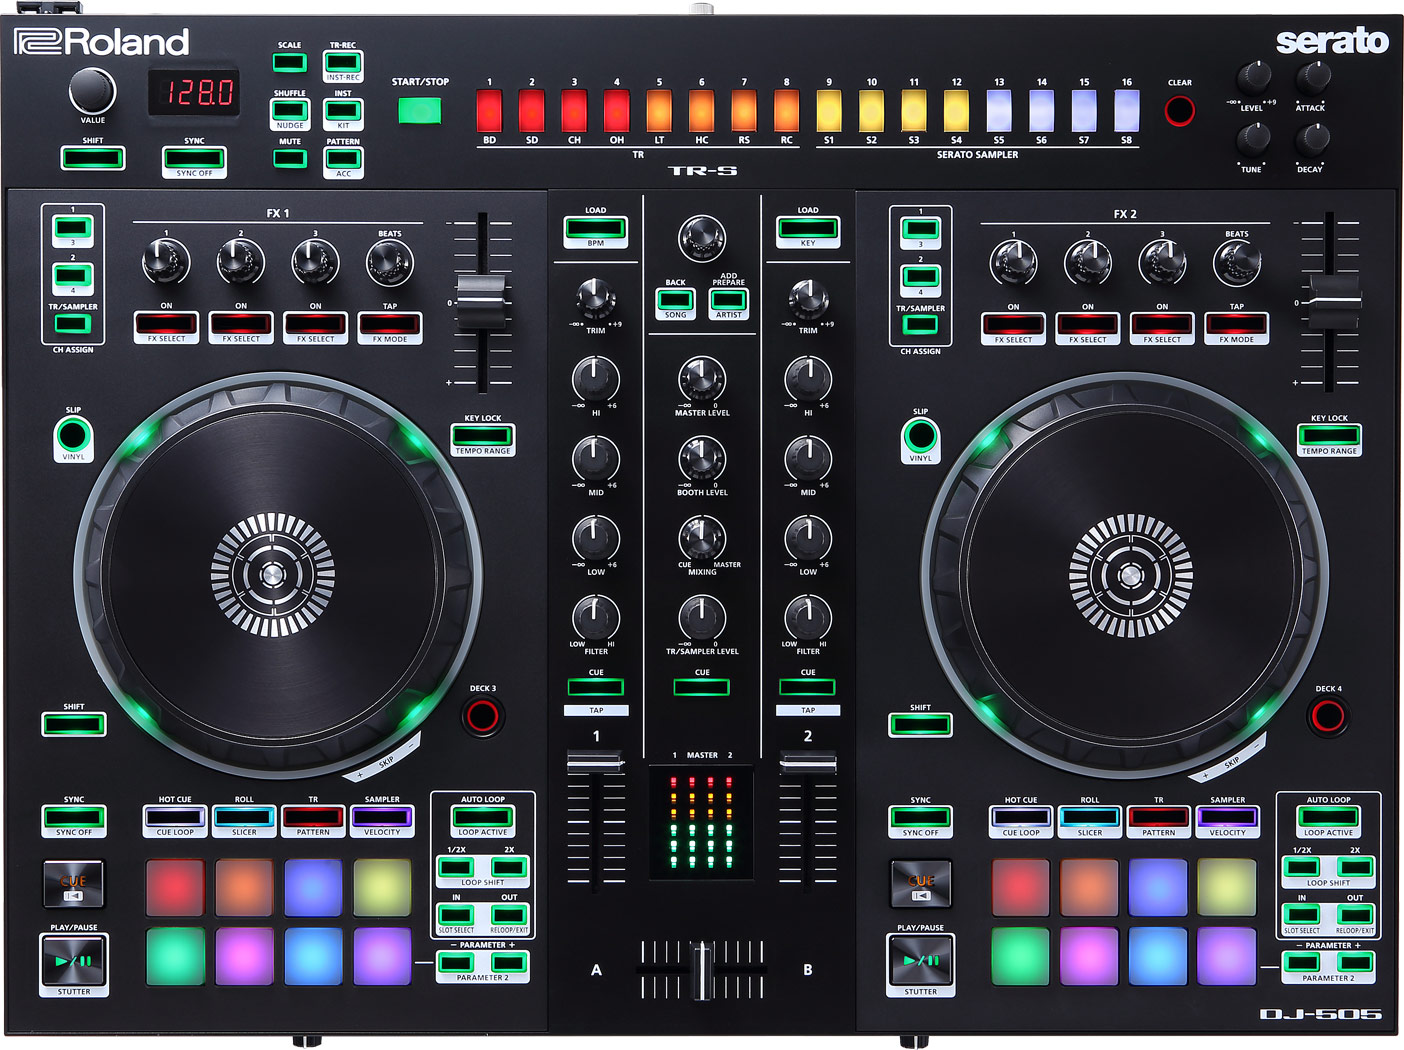
A schematic drawing with the control numbers that are used here can be found on the specified page in the Owner's Manual.
| Browser section (p. 4) | ||
|---|---|---|
| No. | Control | Function |
| 1 | [LOAD] buttons | Load song into deck. |
| 1 | [SHIFT] + [LOAD] button (left) | Sort library by BPM (press repeatedly to toggle ascending/descending order). |
| 1 | [SHIFT] + [LOAD] button (right) | Sort library by key (press repeatedly to toggle ascending/descending order). |
| 2 | Rotary Selector | Turn to move tracklist cursor up/down. |
| 2 | [SHIFT] + Rotary Selector | Turn to move sidebar cursor up/down. Press to toggle the selected item. |
| 3 | [BACK] button | Not yet mapped. |
| 3 | [SHIFT] + [BACK] button | Sort library by title (press repeatedly to toggle ascending/descending order). |
| 4 | [ADD PREPARE] button | (Un-)Maximizes the library view. |
| 4 | [SHIFT] + [ADD PREPARE] button | Sort library by artist (press repeatedly to toggle ascending/descending order). |
| Deck section (p. 5-6) | ||
| No. | Control | Function |
| 1 | Jog dial (top surface) | Perform scratch operation. |
| 1 | Jog dial (outer edge) | Rotate to lower/raise playback speed (and pitch if key lock is off). |
| 1 | [SHIFT] + Jog dial (top surface) | Search fast through the playback location. |
| 2 | [SLIP] button | Hold to turn on slip mode temporarily or double press to turn it on permanently. |
| 2 | [SHIFT] + [SLIP] button | Toggle vinyl control mode. |
| 3 | [SHIFT] button | Hold down to access other functions. |
| 4 | [SYNC] button | Match tempo and phase of other deck. Long press to enable Master Sync. |
| 4 | [SHIFT] + [SYNC] button | Cancels Sync mode. |
| 5 | [CUE] button | Specifies, plays or recalls temporary cue point. |
| 5 | [SHIFT] + [CUE] button | Returns to the beginning of the song. |
| 6 | [PLAY/PAUSE] button | Plays or pause the song. |
| 6 | [SHIFT] + [PLAY/PAUSE] button | Hold to play backwards. |
| 7 | Pad Mode Select | See section "Performance Pads". |
| 8 | Performance Pads | See section "Performance Pads". |
| 9 | PARAMETER area | See section "Performance Pads". |
| 10 | LOOP area: [AUTO LOOP] button | Turns auto loop on/off. |
| 10 | LOOP area: [1/2X], [2X] button | Set the loop playback length to half/double. |
| 10 | LOOP area: [SHIFT] + [1/2X] button | Move the loop by it's length toward the left. |
| 10 | LOOP area: [SHIFT] + [2X] button | Move the loop by it's length toward the right. |
| 10 | LOOP area: [IN], [OUT] button | Specify loop-in/loop-out points. |
| 10 | LOOP area: [SHIFT] + [IN] button | Toggle beats quantization. |
| 10 | LOOP area: [SHIFT] + [OUT] button | Cancels loop playback, go to loop-in point and resume playback. |
| 11 | [DECK 3], [DECK 4] buttons | Switches the deck (left: decks 1 and 3, right: decks 2 and 4) |
| 12 | [KEY LOCK] | Toggle key lock. |
| 12 | [SHIFT] + [KEY LOCK] | Cycles through tempo slider range (8%, 16%, 50%). |
| 13 | Tempo slider | Adjust song playback speed (and pitch if key lock if off). |
| Mixer section (p. 7) | ||
| No. | Control | Function |
| 1 | [TRIM] knobs | Adjust the deck gain (prefader) |
| 2 | [HI], [MID], [LOW] knobs | Adjust the high/mid/low-frequency regions of the song. |
| 3 | [FILTER] knobs | QuickEffect superknob (filter by default, can be changed to a different effect in Mixxx preferences) |
| 4 | Channel [CUE] buttons | Toggle PFL for each channel. |
| 4 | [SHIFT] + [CUE] buttons (short press) | Adjust beatgrid so that the closest beat is set to the current cursor position. |
| 4 | [SHIFT] + [CUE] buttons (long press) | Adjust beatgrid to match another playing deck. |
| 4 | [SHIFT] + [CUE] buttons (tap repeatedly) | Set tempo by tapping on each beat. |
| 5 | Channel faders | Adjust the output level for each channel. |
| 6 | Cross fader | Fades between left and right deck. |
| 7 | [MASTER LEVEL] knob | Adjusts the master output level. |
| 8 | [BOOTH LEVEL] knob | Adjusts the output level of the BOOTH OUT jacks. |
| 9 | [MIXING] knob | Fades between PFL and master output in headphones |
| 10 | [TR/SAMPLER LEVEL] knob | Adjusts output of the TR-S (Aux 3) and Samplers 1-16. |
| 11 | TR/SAMPLER [CUE] button | Toggle PFL of the TR-S (Aux 3) and Samplers 1-16. |
| 12 | Level indicator | Indicate the output level of each channel and master. |
| Effect section (p. 7) | ||
| No. | Control | Function |
| 1 | CH ASSIGN area | Toggle FX 1/2 for decks 1/2 (3/4 if [SHIFT] is pressed) or the TR-S (Aux 3) and Samplers 1-16. |
| 2-5 | Various | See Standard effects mapping. |
| TR-S section (p. 8) | ||
| No. | Control | Function |
| 1 | [VALUE] knob | See Owner's Manual. |
| 2 | [SHIFT] button | Hold down to access other functions. |
| 3 | Display | See Owner's Manual. |
| 4 | [SYNC] button | Match tempo of playing deck (phase matching is not implemented yet, use the NUDGE button instead). |
| 4 | [SHIFT] + [SYNC] button | Not yet mapped. |
| 5-17 | Various | See Owner's Manual. |
| Front Panel (p. 8) | ||
| No. | Control | Function |
| 1 | [PHONES] jacks | Connect headphones here. |
| 2 | [VOLUME] knob | Adjust the volume of the headphones. |
| 3 | [CROSS FADER] switch | Switch the cross fader response curve. |
| 4 | [REVERSE] switch | Switch cross fader reverse (hamster) mode on/off. |
| 5 | [CH1], [CH 2] switches: [PC] | Selects Mixxx deck as input source (Unmute the Mixxx deck and mute Aux 1/2). |
| 5 | [CH1], [CH 2] switches: [LINE/PHONO] | Selects Line/Phono input source (Mute the Mixxx deck and unmute Aux 1/2). |
| 6 | [MIC LEVEL] knob | Adjust the microphone volume. |
You can use the Pad Mode Select buttons to select a mode for the performance pads.
| Control | Mode | LED Color |
|---|---|---|
| [HOT CUE] button | Hot Cue Mode | White |
| [SHIFT] + [HOT CUE] button | Cue Loop Mode | Blue |
| [ROLL] button | Roll Mode | Light blue |
| [ROLL] button (press twice) | Loop Mode | Green |
| [TR] button | TR Mode | Red |
| [SHIFT] + [TR] button | Pattern Mode | Green |
| [TR] button (press twice) | TR Velocity Mode | Orange |
| [SAMPLER] button | Sampler Mode | Magenta |
| [SHIFT] + [SAMPLER] button | Velocity Sampler Mode | Purple |
| [SAMPLER] button (press twice) | Pitch Play Mode | Green |
Most pad modes are similar to those found when used with Serato. A notable exception is the Loop Mode, which replaces the Serato's Saved Loop Mode. In this mapping, the Loop Mode is similar to the Roll mode, but sets a non-rolling beatloop instead.
- Hot Cue Mode: Press a pad that is unlit to assign a hot cue point to it. If a pad is lit, press it to start playback from the hot cue location. Hold [SHIFT] and press a pad to clear the hot cue. After setting or using a hot cue, use the PARAMETER BUTTONS to change its color. Use the PARAMETER BUTTONS while holding [SHIFT] for moving the beatgrid left/right.
- Cue Loop Mode: When the deck is playing and a pad that is lit is pressed, auto loop will start from the location of the hot cue point that is assigned to the pad. If the pad is not lit, a hot cue is specified at the current location and auto loop starts immediately.
- Roll Mode: While holding down a performane pad, a rolling loop plays with the beatlength that is assigned to the pad. The pad that creates a roll of 4 beats length is illuminated. Each pad to the right doubles the length, left halves it. You can use the PARAMETER buttons to cycle through four sets, as described in the Owner's Manual.
- TR/Pattern/TR Velocity Modes: These modes are hardcoded in the device, so they work exactly as described in the Owner's Manual.
- Sampler/Velocity Sampler Play Modes: Press a pad that is unlit to load the track under the cursor into the sample slot assigned to the pad. If the pad is lit, the sample in the slot is played. In Velocity Sampler Mode, pressing the pad stronger results in a louder sample playback volume. When holding [SHIFT] and pressing a pad, sample playback is stopped. If the sample is not playing, the slot is cleared.
- Pitch Play Mode: Play from a hot cue point and change the pitch in semitone steps. Pads right of the white lit pad raise the pitch, pads left of it lower the pitch. Hold [SHIFT] and press a dimly lit pad to select hot cue point. Use the PARAMETER buttons to cycle though different semitone ranges (Up, Mid, Down).
The other modes that are described in the owner's manual (Slicer, Slicer Loop, Saved Loop, Flip) are currently not mapped.
- TR-S Syncing currently works at the BPM level, but phase syncing is not implemented yet. As a workaround, the NUDGE button can be used to adjust the phase. This depends on MIDI clock I/O (Launchpad Bug #682221).
- Some performance pad modes are missing (Slicer [ Launchpad Bug #1828886 ], Slicer Loop, Saved Loop [ Launchpad Bug #1367159, PR #2194 ], Flip [ Launchpad Bug #1768113 ])
- Some buttons are not mapped yet (e.g. BACK)
- LEDs on BACK/ADD PREPARE do not work (this seems to be a hardware/firmware bug and does not work in Serato either)
- Controller does not send current cross fader value on Serato Sysex Message (this seems to be a hardware/firmware bug and does not work in Serato either)
 This is the Mixxx Wiki -
 Mixxx is a free and open-source DJ software.
Manual
Hardware Compatibility
Reporting Bugs
Getting Involved
Contribution Guidelines
Coding Guidelines
Using Git
Developer Guide
Creating Skins
Contributing Mappings
Mixxx Controls
MIDI Scripting
Components JS
HID Scripting